
Structure
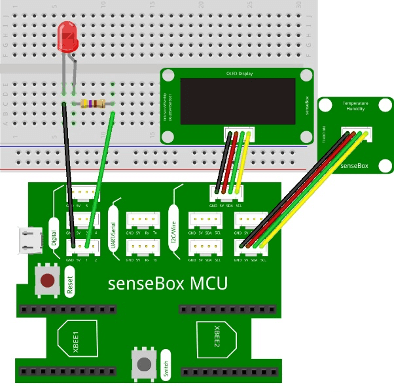
Connect the display and the temperature sensor to one of the I2C/Wire connections of the senseBox MCU using a JST-JST cable. To connect the red LED, you need the JST adapter cable. Connect this to one of the digital/analogue ports. Now you have four free cables in the colours black, red, green and yellow. The black cable is the ground (GND) and therefore also the negative pole of the circuit. The red cable is the positive pole, where 5 volts are permanently present. With the help of the green and yellow cables, you can later determine yourself during programming whether current flows, and if so, how much. To complete your circuit, connect the black wire to the negative pole of the LED (shorter wire) and the green or yellow wire to the resistor connected to the positive pole of the LED (longer wire). The following illustration shows you what the final assembly should look like.
Programming
Step 1: The “if…do” condition
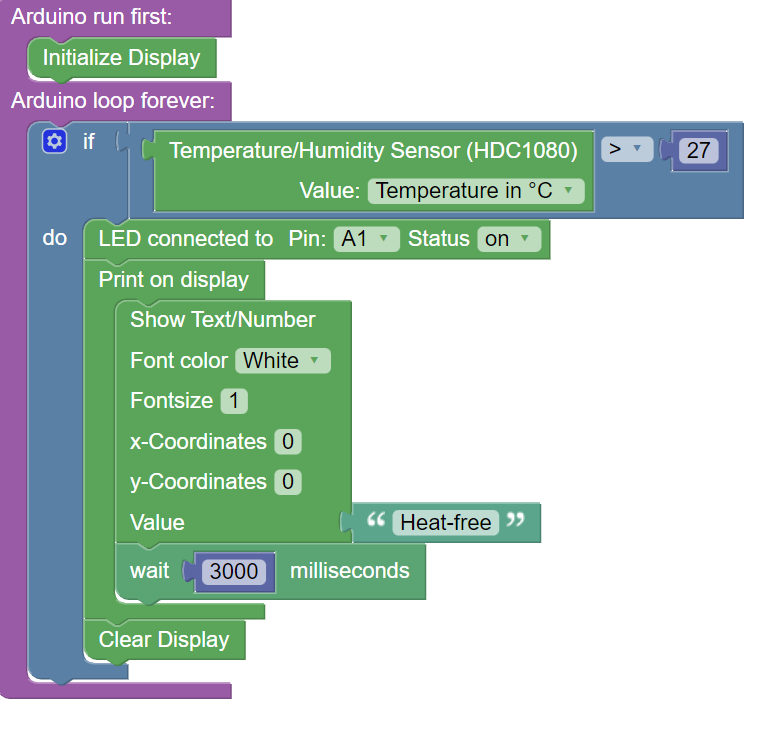
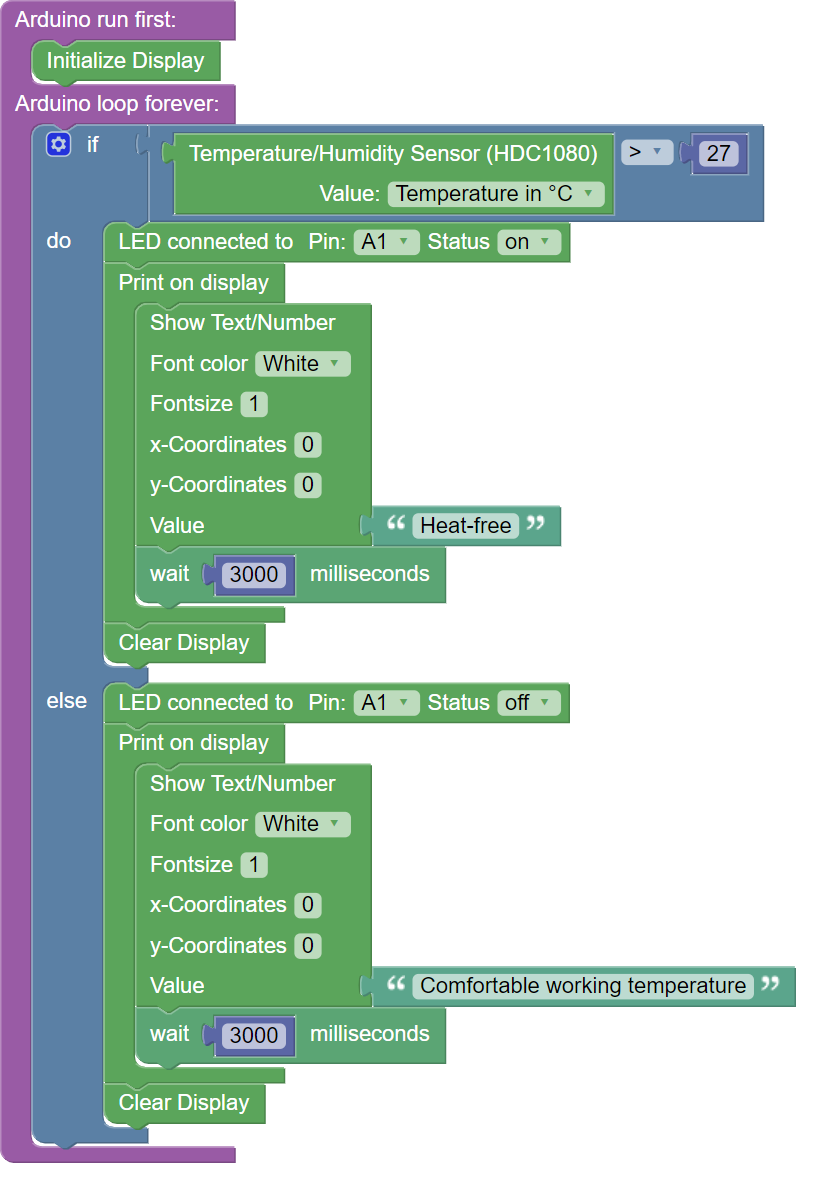
Since you are using the display, it is first of all important to initialise this in Setup() and to specify in the infinite loop() what is to be shown on the display. The necessary blocks can be found under the category ‘Display’. Depending on the temperature, the display should show something different. Therefore we need the ‘if…do’ block from the category ‘Logic’. This works on the principle that the condition in the ‘if’ part is constantly checked. If it is true, the programme is executed within the ‘make’ block. If it is not true, the ‘else’ part of the block is used. This can be added to the conventional ‘if…do’ block by clicking on the grey cogwheel. Now you need to think about what condition you want to set for the heat-free alarm to be activated. Normally, heat-free can be given at temperatures above 27 degrees, so you need a block from the ‘Logic’ category that compares a measurement with a limit you have set. On the left side of the block you can insert the temperature and humidity sensor and on the right side a number from the category ‘Mathematics’. You may now have an equals sign between the two blocks. By clicking on the blue arrow, however, you can change this to a ‘greater than’.

Step 2: Executing the command
Next, you must determine which command should be executed if the ‘if’ condition applies. For example, you can consider that the built-in LED should start to light up and the display should show ‘Heat free! To do this, select the block ‘Write text/number’ from the category ‘Display’ after the block ‘Show on display’ and enter the text in ‘Value’ using a text module. In addition, use the ‘LED on digital’ block and select the pin ‘D1’ and the status ‘On’. If the setup differs from the one in the illustration, you may have to select a different pin. This can be read on the senseBox MCU at the point where the green cable is located. In order for the change to be noticed after an increase in temperature, it is helpful to wait a few seconds before clearing the display again. The appropriate block can be found under the category ‘Time’. At this point it is helpful to know that 1000 milliseconds correspond to 1 second.
Step 3: The alternative
As already mentioned, there is the possibility to extend the ‘if…do’ block with an ‘else’. This is useful to indicate the alternative to be executed if the above condition is not met. You need the same blocks as before, with the difference that the status of the LED is set to ‘Off’ and another text is entered. With the finished programme code, the LED should light up at temperatures above 27°C and the display should show ‘Heat-free’, while at lower temperatures the LED should not light up and ‘Pleasant working temperature’ should appear as text.
Entire Code
The entire Blockly sketch can be found here.